Showing posts with label Snacks. Show all posts

Wednesday, August 22, 2012

Wheat Crackers


I've been obsessively reading parenting books lately (more on that over at Elsa's Baby Talk). Not because I'm having problems with my kids, but because I feel like I need to expand my knowledge in order to keep growing as a parent. While reading the book, I saw that it randomly mentioned snack time. And then it occurred to me.... I had no snacks in the house for my toddler. Since I had peanut butter, I thought instead of bread, which takes several hours to make, I would make some crackers instead. I went with wheat because I thought it would be a bit healthier. I plan to keep using this recipe as a starting point for several other flavors I have in mind.


Wheat Crackers
Original Recipe: Allrecipes
  • 1 3/4 cups whole wheat flour
  • 1 1/2 cups all purpose flour
  • 3/4 teaspoon salt
  • 1/3 cup vegetable oil (I use grapeseed oil)
  • 1 cup water
  • Salt for sprinkling
  1. Preheat oven to 350F.
  2. Mix everything together until just combined.
  3. I changed the recipe at this point. Divide the dough into two balls (I have very large baking sheets, you might need to divide yours into three if you have smaller baking sheets). Flour a surface lightly, and roll out the dough until it's super thin (1/8 inch or less). You will want it super thin because it crisps up much better in the oven. If it's too thick, it will take forever and may even end up like a rock,
  4. Move it over to an ungreased baking sheet. Make lines in the dough with a knife to whatever size you want them to be, but do not cut completely through. Then poke every cracker with a fork a few times (all the way through the dough). Sprinkle on more salt if you want.
  5. Bake for 20 minutes, or longer, until golden brown and crisp (it doesn't crisp up too much more after it's removed from the oven, so let it crisp in the oven).
  6. Let cool and break apart. Repeat with remaining dough.

Saturday, March 3, 2012

Sticky Date Popcorn


While I was standing in the kitchen yesterday, trying to think of something new to do with popcorn, I had a brilliant idea. Right next to my blender was a box of Medjool dates. Date popcorn?? I wasn't sure how to go about making it, so I decided to google it because, let's face it, almost every recipe has already been created. And there it was! I found the recipe at a Colourful Palate and decided to give it a try.

First, I want to discuss the dates and then we'll jump right in to the awesomeness of the popcorn. :) When we buy dates, we usually search for Medjool dates (brand we usually find: SunPalm Fancy California Medjool Dates). They are huge, super sweet, have pits, and are very soft and moist. If you compare them to the bag of Dole dates, you will see a big difference. The Dole dates are about half the size, they do not have pits, and they are sometimes tough or a little dry. I like to use the Dole dates in baking because they're cheap. The Medjool dates I usually eat as is, or use if they are a stand out ingredient that I simply cannot cheap out on. If you use the Dole dates, and I'm sure they would work just fine, you might need to add a few extra and soak them in water.

As for the popcorn, it is very similar to caramel corn in terms of sugar, but it does not harden and you must eat it right after making it. I thought it would turn into a soggy mess after a few minutes, but it didn't. It holds up very well actually. I would still recommend eating it right after making it, but you won't need to inhale it at warp speed to avoid a soggy mess. I also replaced the oil with butter, but feel free to use either. The oil might be better, I'm not sure. But if you use oil make sure you use something flavorless. Also, next time I make this I will see if I can add in 2 extra cups of popped popcorn. I'm hoping I can stretch a buck further.

Popcorn
The blended sauce
Eat right away
Sticky Date Popcorn
Serving Size = 9 cups (might be able to add 2 extra cups of popcorn though)
Original Recipe: Colourful Palate
  • 9 cups of popped popcorn (about 1/2 cup popcorn kernels)
  • 4 - 5 dates, pitted (preferably good quality Medjool dates)
  • 1/3 cup honey
  • 1/4 cup grapeseed oil (I used butter but oil would probably be better and if you don't have grapeseed, then any flavorless oil should work... actually, almond oil might be good as well)
  • 1 teaspoon vanilla
(If using low quality dates, and they appear dry, you might want to soak them in water for an hour or so, but I didn't need to do this)
  1. Have popcorn already popped and ready to go. Heat the honey, butter or oil, until heated through and very runny. Immediately pour into a blender (I have a Vitamix) and add the dates and honey. Blend well. Pour over popcorn, mix well (with hands works the best) immediately and serve. Eat right away.

Wednesday, November 23, 2011

Candied Walnuts II


I found these over at uTry.it, a great cooking blog that I visit often (you can also find the link under "Blogs I Adore" at the top). I decided this would be a great little snack to take to our Thanksgiving dinner...... and thankfully I made 4 cups or else we wouldn't have any to take because hubs keeps snacking on them..... Mimi too. Sigh... :)

Anyway, these are delicious and they're not too sweet. The recipe has two versions. The original version uses 2 cups of nuts, the other version (uTry.it version) uses 4 cups. If you use 2 cups then it will probably taste similar to the candied nuts you can get at the mall. They are extremely sweet and coated with a thick layer of sugar. Usually they are so sweet that you can only eat a few. The 4 cup version, which is the only version I've tried, would be similar (in terms of sweetness) to honey roasted peanuts.... meaning you could eat a handful. So they are sweet, but not over the top.


Candied Walnuts
Original Recipe: uTry.it
  • 2 egg whites
  • Splash of water
  • 1/2 cup sugar
  • 1/2 cup brown sugar
  • 3/4 teaspoon cinnamon (I added 1 teaspoon, maybe more)
  • 1/2 teaspoon salt
  • 4 cups of nuts (original recipe calls for 2 cups)
  1. Preheat oven to 250F and grease a baking sheet.
  2. Combine both sugars, cinnamon and salt. In another bowl, mix the egg whites with the water. Pour the nuts into the egg mixture and coat. Pour the nut/egg mixture into the sugar mixture and toss to coat. Pour onto the baking sheet evenly so they are not on top of each other. Bake for 45 minutes, stirring occasionally. Remove from oven and cool.
Other food I'm making for Thanksgiving:

Thursday, November 17, 2011

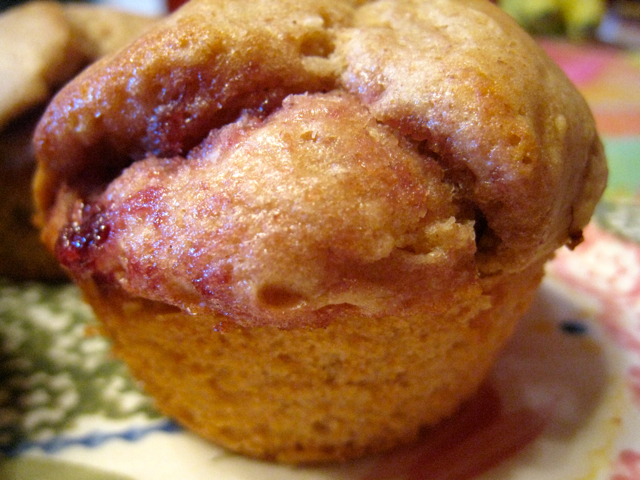
Peanut Butter and Jelly Muffins


First off, let's discuss the muffins. They are yummy and we need to address them immediately. :) My friend Casondra at Pieces of my Heaven on Earth sent this recipe to me. She said her kids love it and I knew my 2-year-old would too. She loves peanut butter and eats it straight from the jar every day. I'm not a huge PB&J fan but even I think these are good. The PB flavor is mild and the muffin is not too sweet overall. Also, they're not dense, which was surprising. Another plus though!

Ok, the next item to address.... EXHAUSTION! Woowwwww I'm tired. I only have 2 kids so I feel like I don't have the right to complain, but wow.... sleepy. My mother-in-law has 10 children. How did she do it? Really, how??

Anyway, it could definitely be worse so I'm not going to complain too much. My little man Emmett has had stomach pains throughout the day so it has been a bit exhausting, but he actually does pretty well sleeping at night. He tends to wake up at 5:30am every so often though but that doesn't bother me too much. Mostly it's just during the day that wears me out. Any suggestions on how to ease tummy pain in infants??


PB&J Muffins
Serving Size = 12 regular size muffins
Original Recipe: Pieces of my Heaven on Earth
  • 1 cup all purpose flour
  • 3/4 cup whole wheat flour
  • 1/4 cup sugar
  • 1/4 cup dark brown sugar
  • 1 tablespoon baking powder
  • 1/2 teaspoon salt
  • 1 1/4 cups low fat milk
  • 2 tablespoons melted butter (unsalted)
  • 1/3 cup creamy peanut butter
  • 1 egg
  • 1 teaspoon vanilla extract
  • 12 teaspoons jam (I used raspberry)
  1. Preheat oven to 400F.
  2. Combine both flours, sugars, baking powder and salt in a bowl and set aside.
  3. Using a mixer, mix together the milk, butter, peanut butter, egg and vanilla. Mix until combined. Pour in the flour mixture and mix until just combined.
  4. Grease a muffin tin and fill halfway (or less, but not more or you will run out of batter) with batter. Add 1 teaspoon of jam to each muffin and then cover with the rest of the batter. 
  5. Bake for 20 minutes. Remove from oven and let cool in muffin tin for about 5 minutes then remove to cool on a wire rack.

Monday, November 14, 2011

French Onion Soup and Croutons


If you're pantry is empty, or if you want to save money.... OR if a newborn kept you awake all night and you want a very easy to make lunch, then here's your recipe.

It's so easy a caveman could do it.
hehehe
Couldn't resist.

Anyway, I made rye bread the other day to go with our steak dinner. Of course there were leftovers, so the next day I chopped up the extra bread and made croutons. This gave me the idea to make French onion soup because I could top it with croutons and cheese. I thought this would be more interesting than a salad. And I was right, much more interesting.... and tastier too. Plus, it's cold outside so it's perfect soup weather.

Rye croutons
Croutons
Serving Size = 4 cups
Original Recipe
  • 4 cups of breads
  • 2 teaspoons garlic salt (I just use garlic and salt)
  • 1/4 cup of butter, melted or use EVOO
  1. Preheat oven to 325F.
  2. Cut bread into 1 inch cubes. Toss with EVOO or melted butter until very lightly coated. Add seasoning and toss to coat (I just used garlic powder and salt).
  3. Place on a baking sheet and bake for 20-35 minutes, or until toasted and crispy.

Start cooking the onions
After a while they should start to caramelize
Add the broth, parsley, simmer and serve
French Onion Soup
Serving Size = 2
  • 2 1/2 cups beef broth (you could also use chicken, vegetable or a combination)
  • 1/2 tablespoon of lemon juice
  • 1/2 teaspoon dried thyme
  • 1 bay leaf
  • 1 tablespoon of flour
  • 2 onions, thinly sliced
  • Salt/Pepper
  • 3 cloves of garlic, finely chopped
  • 1 tablespoon of parsley, chopped
  • Gruyere, Swiss cheese, or fontina
  • Croutons or bread (handful for each bowl or 1 slice per bowl)
  1. Place a stock pot on the stove and set the heat to medium. Add 1/4 stick of butter and let it melt.
  2. Slice the onions thinly (I slice them like thin onion rings) and add to the stock pot. Stir well and add the bay leaf, thyme, salt and pepper. Let the onions cook until they are golden brown and soft (about 25 or 30 mins). In the last few minutes, add the garlic and stir.
  3. Once the onions finish, add 1/4 cup or so of beef broth to deglaze the pan. Stir well so that the brown bits come off the bottom. Once the liquid evaporates, add the flour and stir. Turn the heat down to medium low to keep the flour from burning and cook for about 10 mins to remove the raw flour taste.
  4. Add the rest of the beef/chicken broth and the parsley. Adjust the heat to a simmer and let it cook for another 10 mins. Now it's ready to serve.
  5. Place the croutons on top of the soup, add the cheese and place under a broiler until the cheese melts and browns a bit. You could also just slice some bread, place the cheese on top, broil and then place on top of the soup. Garnish with parsley.

Dear Santa,
Did you see the stunning bowl at the top? Even though I love and adore it, I'm not sure it's made for French onion soup. Could you please deliver me a set of red Technique Flame 2 cup soup bowls that are made for onion soup? You know, the ones with the cute little handles that can also be used on the stovetop, in the oven, broiler, freezer, anywhere, any time, any place, completely amazing.... you get the point. :)
Thanks so much,
P.S. I promise to post more cookie recipes.


Linking to: Mangia Mondays, Tuesday Night Supper Club, Tuesdays at the Table, Hearth and Soul

Friday, November 11, 2011

Two Jalapeno Popper Dips - Regular and Low Calorie

This is the original version, it makes a smooth cheese topping

I found this recipe over at Mrs Happy Homemaker. You can also find her link under my "Blogs I Adore" page at the top. Yes, I adore her blog, so check it out. :) Anyway, as soon as I saw the title of this dip I knew I would have to try it. We're big jalapeno popper fans in this house. I actually made this dip two different ways. One was a low calorie way (my additions) and the other one was the original full fat version (Mrs Happy Homemaker recipe). So you can choose either one. Both were delicious. The full fat version was richer and had more oil, the low fat version had a tangy flavor and less oil. The low calorie one has a crisp crust and the original has a smooth, cheesy crust. Again, both were yummy.

I actually came up with the low calorie one because, as you can guess, I need to lose some of my pregnancy weight. Yikes. And yikes again.


Jalapeno Popper Dip - Original Version
Serving Size = Almost 2-quarts (About 8 - 12 people)
Original Recipe - Mrs Happy Homemaker
  • 2 8-oz packages of cream cheese, softened
  • 1 cup of mayonnaise
  • 8-oz diced green chiles
  • 2-oz canned jalapenos, chopped (I doubled this for medium-hot --- see note below)
  • Parmesan cheese, shredded/grated, roughly 1/4 cup (I used my micrograter)
Note: I've used pickled jalapenos and fresh jalapenos. Both were great, just remember to cut the fresh jalapeno into very small pieces.
  1. Preheat oven to 400F. 
  2. Combined everything but the Parmesan cheese and place into a 2 quart casserole dish. Sprinkle the Parmesan cheese on top.
  3. Bake for 25 minutes or until the cheese is melted and browned a bit.
Low calorie version uses sour cream and panko bread crumbs

This is cooked. The lower fat version makes a crispier crust with the cheese


Jalapeno Popper Dip - Lower Calorie Version
Serving Size = Almost 2-quarts (About 8 - 12 people)
  • 2 8-oz packages of cream cheese, softened
  • 1/2 cup of mayonnaise
  • 1/2 cup sour cream
  • 8-oz diced green chiles
  • 2-oz canned jalapenos, chopped (I doubled this for medium-hot --- see note below)
  • Parmesan cheese, shredded/grated, roughly 1/4 cup (I used my micrograter)
  • Roughly 1/4 cup of panko bread crumbs (just eye it)
Note: I've used pickled jalapenos and fresh jalapenos. Both were great, just remember to cut the fresh jalapeno into very small pieces.
  1. Preheat oven to 400F. 
  2. Combined everything but the Parmesan cheese and place into a 2 quart casserole dish.
  3. Mix together the Parmesan and the breadcrumbs and sprinkle over the top.
  4. Bake for 25 minutes or until the cheese is melted and browned a bit.

Thursday, October 27, 2011

Brie En Croute


Ok, let me start by saying that this is a stunning and very impressive appetizer to serve at any function. However, if you are not a brie fan than you will not be jumping up and down over this. Unfortunately, I've never been a brie fan. I like brie but I don't love it. I LOVE the cinnamon/sugar/walnut combo and when I get a bite of it with the brie, yummy. I think it's yummy because it masks the brie a bit and it becomes almost a cinnamon roll. But those times when I get mostly brie.... eh.

I know, everyone wants to try a recipe that the blog author doesn't care for. haha! What a great review! Oh well. :) It's a great recipe and if you love brie than you will love this. Promise! I still like it even though I'm not a brie fan, so a brie fan will go crazy over it. :) My only tip is to make sure you really spread the topping over the brie so that you won't get any sugarless bites. Also, Paula Deen recommends cutting the top of the brie off a bit to let the flavors blend better. I didn't do this but I would try this in the future.

And baby Emmett is doing great! Here are some random thoughts:
  1. He's a calm little guy.
  2. Having 2 kids is more work but having the second baby is easier. I know what to expect.
  3. His weight is average but NOTHING fits him. Even newborn clothing is huge. I don't get it!
  4. Mimi loves him and will stare at him and smile. She also somehow knows to be gentle with him.
  5. I was worried I would have guilt over a second baby. How could I devote my every minute to Mimi if I had another baby?? I haven't had this problem though. I feel like giving Mimi a brother is a blessing and I think it's definitely a positive thing in her life.
Being a mommy rocks! I love it!


Place the mixture onto the puff pastry
Brush with an egg
Let cool and serve with crackers

Brie En Croute
Serving Size = 1 8-oz wheel
  • 1 sheet frozen puffed pastry, thawed (will try making this from scratch some day)
  • 1 tablespoon unsalted butter
  • 1/2 cup walnuts
  • 1/8 teaspoon ground cinnamon (I added more, maybe 1/2 teaspoon total)
  • 1 8-oz wheel Brie
  • 1/4 cup brown sugar
  • 1 egg beaten
  • Crackers for serving
  1. In a sauce pan, melt the butter over medium heat and then add the walnuts. Cook until golden brown, about 5 minutes. Add the cinnamon and stir well.
  2. Roll out the puff pastry a bit (maybe an inch or two). Place the brie into the middle and then top with the walnut mixture and then the brown sugar (if you want, cut the top of the brie off first and then add the walnut mixture). Lift the corners of the puff pastry and bring together (if the dough doesn't stretch over the brie, then roll the sides out a bit more) and then tie with kitchen twine (I didn't have twine, so instead I brought the dough up and cut off a bit of the excess dough and then smashed everything down so that the dough wouldn't come apart in the oven).
  3. Place onto a cookie sheet. Brush the puff pastry with the egg and bake for 20 mins, until golden brown (I cooked mine about 10 mins longer). Let it cool for about 15 mins before serving or all of the cheese will flow out.

Wednesday, October 5, 2011

Roasted Pumpkin Seeds


Severe back pain has now kicked in. The joys of pregnancy. I actually didn't have this problem with my first pregnancy, thank goodness. I'm pretty much stuck on the couch. If I try to do dishes, laundry, or move around too much then I get shooting pain in my back. On the bright side, I am very thankful that this occurred in the last 3 weeks of pregnancy and not sooner.

Actually, it's closer to 2 weeks now. Ahhh!! I'm so excited!! :)

Before back pain entered my life I did do a few fall activities --- one very popular one --- Pumpkin carving!!!! Yes, I am a mature adult. I sat on my porch drinking tea, eating caramel corn, and carving pumpkins. hehe

So here is the result but cut me some slack, I am not very good at this......

He's a happy pumpkin. I'm more into cute decorations
and not the scary kind.

What I am good at is dealing with the pumpkin guts. :) I cleaned them, picked out the seeds, and roasted them. YUM! Even my toddler was munching on them and she's very picky. Now, there are a lot of ways to roast pumpkin seeds. Some people boil them, dry them, then roast them and all kinds of other techniques. I probably only eat pumpkin seeds once a year during Halloween, when I'm carving the pumpkins, so I haven't tried very many different versions. But I love this recipe and it's super easy.

Spread them out on the pan and roast

Roasted Pumpkin Seeds
  • About 2 teaspoons of melted butter per 1 cup of seeds
  • Salt to taste
  1. Preheat oven to 300F.
  2. Clean the pumpkin seeds off. I usually put them into a strainer and fill it with water. The seeds float to the top a bit and I scoop them out. Rinse once more to make sure everything is clean, but it doesn't have to be perfect. Dry them off with a towel and place them into a bowl. Toss with the butter and salt to taste. Lay on a baking sheet in one even layer. Roast for about 45 minutes, stirring from time to time.

Sunday, October 2, 2011

Cilantro French Bread


It's time for me to welcome a new member to our family. Baby Emmett? Nope, not yet!

A beautiful, made in America, hand thrown chip and dip set. We all know I love pottery. I REALLY love American pottery though and I've been trying to beef up my collection a bit. The reason I love it isn't just because I'm supporting small businesses in the US but because they match everything I own. Really. Most US pottery that I find only uses about 3 or 4 colors, which means it's super easy to match it up with my hand painted, extremely bright, very busy, international pottery. My collection is made up mostly of American pottery and accented with pottery from different countries (Morocco and Mexico mostly).

Ta da!
I love that the bowl can be removed, leaving a big platter
I'm trying to be artistic :)

Anyway, I LOVE it so expect to see it often. :) I want to make some type of fruit dip next.

As for the bread, that turned out pretty well too. I've seen a recipe similar to this on Bon Appetit, but instead of following their bread recipe I just made French bread and rolled the herbs up inside of it. I definitely prefer it dipped in hummus than as a stand alone bread. For the hummus, I left out the paprika and cilantro. I also used tahini since I recently found a brand that doesn't cost a fortune or expire in 2 minutes.

Mix the herbs and oil 
Spread onto the bread and sprinkle on the sesame seeds
Roll up the bread
Cilantro French Bread
  • 1 cup of cilantro and parsley (mostly cilantro, a bit of parsley - or skip the parsley all together)
  • 3 tablespoons of oil (EVOO)
  • Sesame seeds to taste
  • French Bread Recipe (I used bread flour and halved the recipe. By the way, I need to write a new review for this bread because the more I make it the more I love it.)
  1. Chop up the cilantro and optional parsley. Add the oil and mix. After you roll out the French bread, spread the herbs across the bread evenly. Sprinkle on the sesame seeds (as much as you like) and roll the bread up. 
  2. Continue with the rest of the French bread recipe.
Hummus
  1. I left out the paprika and herbs. I also used tahini instead of a nut butter substitute.

Wednesday, August 31, 2011

Pita/Flatbread/Pizza with Za'atar


I wanted to share this quick and easy recipe with you. I still haven't posted a recipe for za'atar, but I plan to once I use up my store bought version. This is a great snack or just something to serve with dinner to replace rolls. My favorite thing to eat this with is a salad though.

Click here for the recipe for homemade pita bread.

Pita /Flatbread/Pizza with Za'atar
  • Extra Virgin Olive Oil
  • Za'atar Seasoning Blend
  • Pita Bread (what I used) or flatbread or even a small thin cooked pizza crust
  1. Preheat oven to 400F.
  2. Brush the bread with a little bit of EVOO and sprinkle on a teaspoon or so of the za'atar seasoning. Bake in the oven for a few minutes, until warm and as brown as you want.
  3. Cut into wedges and serve. 
In other news, I am working on a second blog. I've decided that the Baby Talk page is so much fun that I want to expand it. I also thought that cloth diapers and recipes were not a good combination! :) This blog will focus on family/children, no recipes though. Even the kid-friendly recipes will still remain on this blog.

I've also been stressing about the following:
  • Baby Names
  • Baby Diapers
  • Cleaning the house for.... the baby
  • Baby Clothes
  • Baby Supplies
  • How will Mimi like the baby?
  • Where will the baby sleep?
Are we seeing a pattern here?
My mind has went into full-blown baby mode to the point where I've gone a little loony. I can barely think about anything else (good time to start a baby blog) and as soon as I make a decision, I change my mind. I've had to tell myself to calm down because I would burst into tears. I'll try a few diaper brands, I have two names picked and I'll make one permanent when I see the baby, the house will get clean, and how many outfits and supplies does a newborn really need? C'mon. I can see that nesting is right around the corner. I'm kind of looking forward to it. Clearly I have some energy that needs to be put to good use. Don't worry though, I went loony towards the end of my pregnancy with Mimi as well. Apparently this is normal for me.

Anyway, there ya have it! I'll keep you posted on my second blog. :)

Wednesday, August 24, 2011

Salsa I, Jalapeno Kitchen Tips, and Baby Dreams


I've been interested in homemade salsa lately. This is a very basic recipe, but I want to explore and find different types to play with and post later. What started this whole interest was when I went on vacation to TN (remember? I bought a million dollars worth of clay pottery. hehe). We went to a Mexican restaurant where the food was amazing, the restaurant was colorful, family friendly, and we just had a great time. The salsa was actually pretty plain but I LOVED it. The reason it was so delicious was because it was fresh. You could taste that it was made THAT day. They didn't need a lot of spices or fancy ingredients, it was simply fresh. I wanted to recreate that experience. While this isn't exactly the same, it's still pretty darn good. I made ours super hot (as in burn your stomach hot) by chopping up 2 whole jalapenos with seeds. Use 1 jalapeno and no seeds to keep things mild.

Kitchen Tip: I do not touch jalapenos and I never remember to buy gloves. When I use them, I simply get a pair of very sharp scissors and while holding the stem, I cut them lengthwise into as many pieces as I can (stopping right before the seeds if I plan to leave them out), and then while still holding the stem I cut the pepper crosswise to make little pieces. Once I'm done, I pitch the stem and the scissors go into the dishwasher. Now when I take my contacts out at night, my eyes will not burn for several minutes. Woohoo!

Expect more salsa posts in the future and please share your recipes with me as well!


Salsa I
Serving Size = About 2 cups
  • 1/4 cup or so of cilantro
  • 4 - 6 large roma tomatoes (mine were abnormally large)
  • 1 very small onion, chopped (and my onion was abnormally small)
  • 1 - 2 jalapenos, chopped
  • 1/2 - 1 teaspoon of salt, to taste
  • 1/2 teaspoon black pepper
  • 1/2 tablespoon oil
  • 1/2 tablespoon vinegar (apple cider is fine)
  • 1 garlic clove, grated (I just use a microplane)
  • 1 teaspoon or so of ground cumin, to taste
  1. Place everything into a food processor and pulse for a few seconds until it reaches desired consistency. Or chop everything up by hand and mix. Let is sit out at room temperature for an hour, mix and then refrigerate.
Baby update! --- Dreaming of Baby
I'm feeling better about the names. I'm pretty sure we're going with the name Emmett because I had a dream about it. I know, silly, but it's true. I dreamt that I was looking out the window while Mimi and our baby boy were playing (they were running around their playground set -- Mimi first, baby boy following) and I yelled at them, "Mimi, Emmett, it's time to come in." And both of them came running. He was adorable with dark brown hair, brown eyes, and his skin was a tiny bit darker than Mimi's. He was also a little bit chunky. He was wearing jeans and a dark brown, zip-up, heavy knitted sweater (it was autumn, apparently).... very adorable. :) And what's interesting is that the dream was before I even seriously considered the name Emmett. I was actually leaning towards Eliot, so it seems like I would dream of that name, but I didn't. Another thing that's interesting is that I had a big and pregnant belly in my dream. Baby number 3???? haha!

Sunday, August 7, 2011

Krachel (Moroccan Sweet Rolls)


I have so many notes about this recipe that I'm just going to address them right away. 

Here we go:
  1. First, this is a very dense sesame/anise bread with a good amount of sugar in it. In terms of sugar, I wouldn't compare it to a cookie, but I would say it's a bit sweeter than the typical American sweet roll. I would serve this with breakfast, as a replacement to pancakes/waffles/etc, or as a snack. If you want to serve it with dinner, or you're not a fan of sweet then you could halve the sugar.
  2. I prefer this recipe with a hint of anise so I only use 1 teaspoon but I could stand 2 teaspoons as well. Adjust to taste.
  3. The color should be dark on top and to achieve this I brush the top with an egg yolk. 

And if you have a toddler, they will probably eat it, but I think they will spend the majority of their time picking the tiny sesame seeds off the top and eating them. This is so very cute until they sneak into the kitchen and quietly pick all of the seeds off the other rolls and then you have naked krachels. hehehe 
Toddlers are hilarious.

Baby Name Update
Same as before
Samuel and Elliot
Love both, can't decide which though. My life might have been easier if I were pregnant with twin boys (or not...). I'm thinking about waiting until he is born and just staring at him for a while to decide which one fits. I find that challenging though. I'm the parent that likes to be overly prepared. I want everything in place, just right and decided before the baby arrives. When I went to the hospital to have Mimi I had two huge diapers bags full of stuff just for her, plus a suitcase for me. I hardly used anything I packed, but I was happy knowing I had everything. Almost literally everything. :)

Sugar, salt, sesame, anise
The dough, after kneading
It should be a little bit sticky when done
Place onto a baking sheet
Brush with egg yolk and sprinkle on sesame seeds
A dense sweet roll
Krachel
Serving Size = About 12 rolls
  • 2 cups all purpose flour (plus extra, about 1/2 cup)
  • 1/2 cup of sugar (can halve if you don't want them too sweet)
  • 1/4 cup warm milk
  • 1/4 cup warm water
  • 2 teaspoons active dry yeast
  • 3 tablespoons unsalted butter, melted
  • 1 egg for the dough
  • 1 egg yolk to brush top with
  • 1/4 teaspoon salt
  • 1 tablespoon sesame seeds
  • 1 - 2 teaspoon anise seeds, to taste (I use 1 teaspoon for mild flavor)
  1. Mix together the water and yeast, set aside.
  2. Mix together the flour, sugar, salt, sesame seeds and anise seeds in a mixer (or by hand if you don't have one). I used the flat beater, but you could use the dough hook too. Pour in the milk, yeast, butter and 1 egg. Mix. It should be sticky, but it should still come together in a ball. If it doesn't, add some additional flour 1 tablespoon or so at a time.
  3. Remove from mixer and place on a floured surface, knead for a few minutes until it looks smooth but still sticky. Place into a bowl, cover with a towel and leave in a warm place for 1 hour.
  4. Separate the dough into balls about the size of your palm (I get about 12). Flatten them a bit and place them on a greased baking sheet.
  5. Cover them and let them rise for 1 hour.
  6. Preheat oven to 350F.
  7. Brush the top of each roll with the egg yolk and then sprinkle on some sesame seeds.
  8. Bake for 25 - 30 minutes or until cooked through and browned on top.

Linking to: Hearth and Soul

Wednesday, June 22, 2011

Chewy Granola Bars - Attempt 1


I've made granola before, but I've never bothered with chewy granola bars and I have no idea why it took me so long to make them. I found this recipe online and I ignored the reviews and went with the original recipe, which was a mistake. The taste is there, I love it and it's very simple. Many granola recipes call for all kinds of ingredients that I never buy. The only problem I have with this recipe is that it doesn't stick together well. Next time, I will increase the honey to 1 cup as suggested (many suggested 1 cup of butter as well, but I will try to avoid increasing the butter first).

And in other news, Vlasic Zesty Dill Spears might be unhealthy, but they are hands down the most delicious thing ever. Not only do I eat them like crazy but I even drink the juice. My poor boy will be born with issues from this, I can feel it. hehehe The second most delicious thing, in case you were wondering, is watermelon. Now that we've cleared that up, I will go ahead and share the recipe with you. :)

Chopped nuts
Add dates to the mix

Chewy Granola Bars
Serving Size = 3 dozen (I had less)
Original Recipe
  • 4 1/2 cups rolled oats (next time I will do 4)
  • 1 cup all purpose flour
  • 1 teaspoon baking soda
  • 1 teaspoon vanilla extract
  • 2/3 cup butter, softened
  • 1/2 cup honey (next time I will do 1 cup)
  • 1/3 cup packed brown sugar
  • My Additions:
  • Roughly 1/2 cup or so of chopped dates
  • Roughly 3/4 cup Almonds, Walnuts and Pecans, chopped
  1. Preheat oven to 325F. Lightly greased a 9x13 inch pan.
  2. In a very large bowl combine the oats, flour, soda, vanilla, butter, honey and brown sugar. Stir in any additional ingredients.
  3. Pressed firmly into the pan and bake for 18-22 mins or until golden brown. Let cool for 10 mins then cut into bars. Let bars cool completely in pan before removing.

Tuesday, April 26, 2011

Karentika (Eggs and Chickpea Flour)


As you probably know already, since years ago in my apartment days I have always wanted a Mexican inspired kitchen. I adore the colors, the talavera pottery (thanks to Kate!), and the art. I found this adorable orange spoon rest that looks talavera, but I don't know (it was awfully cheap, so I question it, but it's ok if it isn't). I LOVED my other spoon rest. It was orange-ish yellow, with sunflowers painted on it and it looked beautiful against my black stove, next to my red tea pot. Unfortunately, my toddler, Mimi, accidentally broke it several months ago. I haven't been able to find one in a similar color until now. The color is almost identical, so I am thrilled. I know, it's the small things in life. haha

My kitchen isn't even close to being a 100% Mexican design. In fact, I would say it's half Mexican and half Moroccan. I'm pretty sure I'm one of the few people with a Mexican/Moroccan kitchen. So below is my new spoon rest, AND my new Moroccan spice holder tagine (both cheap and combined coming in under 20 dollars). And below allllll of that is a recipe for Karentika, an Algerian snack/breakfast/lunch. It's usually served with a baguette and harissa paste (hot pepper paste). My favorite thing about this meal is the texture. The bottom is almost like a dense cornbread, and the top is eggs. It's really interesting and very mild. If you want more cumin, I would recommend sprinkling it on top at the end.

Mexican spoon rest
Moroccan spice holder
Sheesh, are there anymore countries that I could squeeze into this post today???? haha

Chickpea flour
Pour into a baking dish
Bake until the top is brown and set
Karentika
Serving Size = 3 - 4 small servings
  • 2 eggs
  • 1 cup of chickpea flour (you can grind your own, but I recommend buying it)
  • 1/2 cup oil
  • 1/2 cup milk
  • 1 cup of water
  • Salt/Pepper, to taste (1 tsp or so)
  • 1 teaspoon of cumin (plus more to sprinkle on the top at the end)
  1. Preheat oven to 350F, lightly grease an 8x8 inch baking dish.
  2. Mix together all of the ingredients (I used a hand held mixer) and then pour into a baking dish (you might want to lightly butter the dish to keep it from sticking). 
  3. Bake for 45 minutes, or until the top is brown and set. If you want, you can sprinkle on some cumin. 
  4. Serve with a baguette and harissa paste.
Linking to: Hearth and Soul