Showing posts with label Bread. Show all posts

Saturday, May 4, 2013

Biscuits


The other day I was making biscuits for breakfast. I went to my blog to get the recipe and realized I never posted it. So here it is, my favorite biscuit recipe. I serve them with jam or honey. The next day, the leftovers are split open, topped with cheese (melted under the broiler) and then topped with a fried egg.


Biscuits
Serving Size = Around 8 biscuits
  • 2 cups all purpose flour
  • 1 tablespoon sugar
  • 3 teaspoons baking powder
  • 1/2 teaspoon salt
  • 1/2 cup of butter
  • 1 egg
  • 2/3 cup of milk
  1. In a food processor, mix together the dry ingredients, pulse to mix. Chop up the stick of butter into 1 tablespoon pieces. Add to processor and quickly pulse until it's a bit thicker than sand.
  2. In a bowl, mix together the egg and milk. Turn the processor on, add the egg mixture, and pulse until it forms a ball.
  3. Put a bit of flour on a surface, remove the dough from the processor and knead about 8 or 10 times, until it comes together. Roll out into about a 1-inch rectangle. Using a drinking glass, or biscuit cutter, cut out about 8 biscuits.
  4. Place onto a greased baking sheet, and bake in a preheated 450F oven for 8 - 10 minutes.
  5. When done, brush the tops with melted butter (optional).

Wednesday, March 6, 2013

Homemade Flour Tortillas


At first, flour tortillas might seem like a lot of work, especially when you think about rolling each tortilla out, but honestly, they take no time at all. For this recipe, which makes 9 very large tortillas, it takes about 10 - 15 minutes total to mix the dough and roll each one out. Cooking time is seconds for each one. Most people with bigger families might consider doubling the recipe, but even that will only take about 15 - 20 minutes. Sure, it isn't as easy as opening a pre-made package, but the difference in flavor is night and day. I promise. And it's light-years healthier, too.

My favorite meal to serve these with: Picadillo


Homemade Flour Tortillas
Serving Size = 9, 10-12-inch tortillas
  • 2 cups all purpose flour
  • 1/4 teaspoon salt
  • 1 teaspoon baking powder
  • 1 tablespoon oil
  • 3/4 cup water
  1. Mix together the dry ingredients. Place water in a bowl and add the dry mixture. Mix until it comes together. Knead it for a minute or two, or until it becomes smoother.
  2. Divide into 3 pieces, then each piece into 3 more. Roll each tortillas out, keeping flour handy so nothing sticks. They will be about 10-inches, maybe 12. But you can make them any size you want, or even leave them thick instead of thin.
  3. Heat a large skillet over medium high heat. Toss one tortillas on and let it cook for a few seconds, turn and cook a few more seconds, remove to a plate. They should have some golden brown spots on them, when done.

Saturday, September 22, 2012

Pull Apart Rolls


I've made a lot of rolls in my time, but I think I've finally found my ultimate go-to roll. They baked up perfectly, the outside has a thin, flaky, golden crust, the inside is super soft, and you can adapt it to match any meal by switching up the flavor profile. Plus, you can pull it apart as you eat it. Who doesn't love to do that?

The dough before I let it rise for 1 hour
Cut into 36 pieces
Placed into the pan
After letting it rise
Removed from the oven

Pull Apart Rolls
Serving Size = 12 rolls
Original Recipe: Allrecipes
  • 2 1/4 teaspoons of yeast, dry active
  • 1 cup warm water
  • Pinch of sugar
  • 1/4 cup melted butter (plus more to brush tops with)
  • 2 cups flour + 1 1/2 cups flour (I used bread flour)
  • 2 tablespoons sugar
  • 1 teaspoon salt
  • Optional flavors: 1/2 teaspoon thyme, 1/2 teaspoon oregano, 1/4 teaspoon dill
  1. In a mixer bowl, combine the water, yeast, and a pinch of sugar. Leave it for a few minutes, to allow the yeast to activate (should bubble up).
  2. Attach the dough hook to the mixer and add the butter, 2 cups of flour, salt, 2 tablespoons of sugar, herbs, and mix on speed 2.
  3. Once it starts to come together, add the 1 1/2 cups of flour in 1/2 cup increments (you might need 1/2 cup less, or even more, just watch the dough and add as needed). Let the dough knead for several minutes.
  4. Once done, cover with plastic wrap or a towel and let rise in a warm place for 1 hour or until doubled in size (I put it in the oven, and preheat the oven for about 1 minute, or until warm, and then shut the oven off, letting it rise for an hour inside).
  5. When done, roll the dough out into a disc shaped on a lightly floured surface. Cut into 6 even pieces. Divide each piece into 6 more pieces, for a total of 36 pieces.
  6. Roll each into a ball, and in a greased muffin pan, add 3 balls to each space. You will have a total of 12 rolls.
  7. Cover and let rise in a warm place for 1 hour, or until about doubled in size. Brush with melted butter and bake in a preheated oven (400F) for 15 - 20 minutes.
  8. Remove from pan and let cool on wire rack. 
Linking to: Gallery o Favorites, Full Plate Thursday 
, Foodie Friday

Tuesday, April 3, 2012

A Review: The Authentic Gourmet French Made Butter Croissants


This is not a paid advertisement. All opinions are my own and were not influenced.

I love to cook as much from scratch as possible, but I'll be honest, making croissants intimidates me a bit. In order to be a wonderful croissant they must be as light as air, flaky, almost hollow inside as you pull them apart, and packing a rich buttery flavor. Anything other than that is disappointing. I do plan to make them someday, but I know they require the entire day. With two small children, a part-time job, and a fixer upper house, this isn't going to happen as soon as I'd like.

While I'm being honest, let me also admit that I probably would never have bought these if I hadn't tried them first. They are expensive - 26 of these runs $43.73 at QVC.com. Yes, that's right, lift your jaw off the floor my friends. If it weren't for my parents giving us a few to try, I would never have tried them. How sad that would have been. My husband and I are hooked. I plan to spend the money and buy a box. They are expensive, but they're a luxury item that we won't eat daily. They are buttery, flaky.... the layers, oh the yummy layers. Jam, Nutella, or butter would be great on these but I usually eat them plain.

And if you're wondering if they actually taste like croissants in France (they're made in France actually), well, I can't answer that personally. I've never been to France, so I can't compare. My husband, however, has been to France a few times and he says they taste authentic.


When you receive them, they will be frozen and flat. It's startling because you start to wonder if you just wasted your money. But preheat the oven to 350F, line a baking sheet with wax or parchment paper, and bake them for about 25 minutes and voila.....


With a little time they turn into the beautiful image you see above.

I cannot recommend these enough. I adore them. I could live off of them.

If you're interested in placing an order, you can find them at QVC.com. 

Linking to: Gallery of Favorites

Thursday, March 15, 2012

Irish Soda Bread


Talk about a gorgeous, rustic, delicious bread. Normally I would be depressed if a loaf of bread came out of the oven looking this rough, but not when it comes to Irish Soda bread. If you haven't had this before, it's almost like a biscuit and bread combined. It's the perfect bread to make if you're in a hurry. The prep time is almost non-existant and it only takes about an hour to bake. 

My only suggestion is to keep an eye on it when it reaches 50 minutes in the oven. You might need to add an additional ten minutes, but it's really easy to burn the bread at that point.


Look how beautiful it is. I love rustic dishes......

Serve this with a stew, or some cheese, maybe jam, or even make an open faced sandwich out of it. You can also slice it or cut it into wedges.

Form the dough into a ball
Serve
Irish Soda Bread
Serving Size = 1 loaf (I would serve this to 4 people maybe)
Adapted From: Mommie Cooks
  • 4 3/4 cups all purpose flour
  • 1/2 teaspoon salt
  • 1 teaspoon baking soda
  • 3 tablespoons honey
  • 1 egg
  • 1 1/2 cups buttermilk (if you're out, then add 1 1/2 tablespoons of lemon juice to milk and let stand for about 5 minutes)
  • 4 tablespoons butter, melted
  1. Preheat the oven to 350F.
  2. Mix together the dry ingredients, add the wet ingredients and mix until just combined. Do not over mix. Form into a round ball, place on a baking sheet. Cut a few slits across the top, or cut an X across the top like I did (not too deep, just little quick slices... use a sharp knife).
  3. Bake for 50 minutes to 1 hour, or until a toothpick inserted comes out clean.
Linking to: Full Plate Thursday, Whimsy Wednesdays, Foodie Friday, Friday Favorites, Gallery of Favorites

Saturday, February 11, 2012

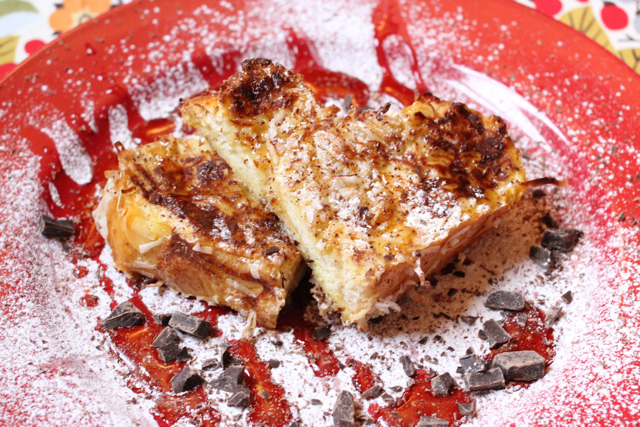
Baked Coconut French Toast (Challah)


The other day I made challah with the hope that there would be enough leftover for French toast the next day.... and there was, yay! But I didn't want to make just any French toast, I wanted to change it up and make something different. I decided on coconut French toast. Delicious! I even stored some in the fridge and re-heated it and it still tasted pretty darn good. I love that it baked up so beautifully in the oven and I didn't have to cook a few at a time on the stovetop. Back in the day this wouldn't have bothered me, but now that I have a 2-year-old, a newborn, and a job (I work from home) life is getting a bit crazy busy. By the end of the day, when I'm waiting for my husband to get home from work, I go into a trance. Seriously, I just stare off into space for a while. Then he gets home and I think I literally fling the children at him so that I can have a break. Yes, literally. hehe And guess what mommy break time means? Leftover French toast! Yay!!! :)


And did I mention that this would be the perfect breakfast to share with your loved one on Valentine's Day?? Drizzle some chocolate on it maybe??

Egg mixture
Coconut flakes
Challah
Soak the bread in the egg mixture
Serve
Baked Coconut French Toast
Adapted From
Serving Size = 4 pieces
  • 4 pieces of challah, 1-inch thick
  • 4 large eggs
  • 1/2 cup milk
  • 1/2 teaspoon cinnamon
  • 1 tablespoon sugar
  • 2 cups coconut flakes (roughly)
  1. Preheat oven to 475F. Grease a baking sheet (I used cooking spray).
  2. Mix together the eggs, milk, cinnamon, and sugar. Soak each slice of bread in the mixture for about 1/2 a minute per side. Take coconut and pat it onto each side, set on baking sheet. Do this will each slice.
  3. Place in the oven and bake about 5 minutes per side (flip them over after 5 minutes).
  4. Serve with chocolate or syrup.

Thursday, February 9, 2012

Challah and The Weird Sisters Book Review


I'm going to change things up a bit and hopefully do this every few months. This will be my book and food series. My goal is to read a book, find food mentioned in it or inspired from it, make the food, share the recipe, and review the book. Think dinner and a movie. ;) Enjoy!

The Book Review:
The Weird Sisters, by Eleanor Brown (2012), is a book about three sisters Rose, Bianca (Bean), and Cordelia (Cordy) returning home. The three sisters all create their own difficulties in life and have to find a way to overcome them with the hopes of a better life. If I had to describe their relationship in one quote, it would be this one: "See, we love one another. We just don't happen to like one another very much (28)." They would do anything for each other, but they simply cannot get along.

Cordy spoke to me the most out of these characters because I can relate to her (although, I'm not nearly as wild and crazy, wow!). She's a bit of a hippy, easy-going, doesn't stress too much, and is ok with people making decisions for her because she's too laid back to care. Hair, clothes, and make-up are not really a priority in her life, but she does love to cook. Yes, I love Cordy, and everyone else does as well, which makes the other sisters jealous. She's everyones favorite. Rose is the oldest and wants to mother everyone. Everything has to be just so, which results in mountains of stress for her. The middle, Bean, is self-centered. She wants to look good, feel good, and have fun at any cost. But eventually life catches up with them. Rose needs to learn to let go, Bean needs to escape her own personal hell, and Cordy needs to take responsibility.

As for the parents, well, getting to know them explains a few of their unusual quirks. Their father is a professor at the local university. He is obsessed with Shakespeare and quotes him almost every time he speaks. At first, this drove me insane. I complained about it to anyone that was around me while I was reading, but I think that's the point. I think he was intended to annoy the reader because he annoyed the sisters as well. It seemed like it was his odd way of forcing his children to think for themselves. Their mother, who is battling an illness, weaves in and out of their conversations, missing most of what is being said. Not because she's ill though, it's just her way. But she loves them, would do anything for them, and when it comes time for her to add her two cents, she does it beautifully and possibly makes the biggest impact.

Overall: Lovely book, quick and easy read. This book isn't so deep that you get lost, but it isn't so predictable that you're left yawning. It's a great book to help you relax and unwind.

Click here for the Blogher Discussions Page.

The Recipe:
I selected challah because of Cordy's love for baking, especially her love for braided breads. I believe this bread even became French toast in the book, so guess what we're having for breakfast tomorrow? :) The bread is sweet and delicious and I adore the look of the tiny braided bread on top of the large one.

Let the yeast activate
Double in size
Braid
Brush with egg wash
Let cool
Beautiful, tall slices, perfect for French toast
Challah
Serving Size = 2 loaves (2 of the small braids, 2 of the large braids)
Original Recipe: The Frugal Girl
  • 1 cup warm water
  • 4 1/2 teaspoons active dry yeast (or 2 packages)
  • 2 tablespoons sugar
  • 1/3 cup butter, softened or melted and cooled
  • 1 1/2 teaspoons salt
  • 5 1/4 - 5 3/4 cups all-purpose flour
  • 4 eggs
  • 1 teaspoon water
  1. In a mixing bowl (I used my Kitchenaid Mixer), add the water and yeast. Let the yeast activate, takes about 2 minutes. Add the sugar, butter, and 1 1/2 cups flour. Mix well. Add the salt, keep mixing. Stir in 3 whole eggs and 1 egg white (reserve the yolk). Mix until a soft dough forms, adding flour until achieved.
  2. Lightly flour a surface and knead until smooth (I usually do this in the mixer as well). Place in the bowl, cover, and let rise for about 1 hour or until doubled in size (TIP: I like to put bread in a warm environment, so I preheat my oven long enough to make it warm, shut it off and then put the dough in to rise).
  3. Divide the dough into two pieces, then divide each piece into two more pieces (one should be about 2/3 of the dough and the other 1/3 of the dough). Divide all pieces into three pieces to braid. For one loaf, roll out the three pieces of the large dough into 12-inch ropes. Then roll out the three pieces of the small dough into 6-inch pieces. Braid the large dough, then braid the small dough. Stack the small on top of the large, place on a baking sheet, cover and let rise for 35 minutes or until doubled in size. Repeat with the second loaf.
  4. Preheat the oven to 350F. Add one teaspoon of water to the egg yolk and mix. Brush each loaf with the egg yolk and water. Bake for 20 - 25 minutes or until golden brown. Let cool on write racks. Note: The top braid could slide off a bit during baking. Once you slice it, the pieces will still look pretty good.
This is a paid review from the Blogher Book Club, but the views expressed are my own and were not influenced in any way.

Linking to: Full Plate Thursday, Foodie Friday, Foodtrip Friday, Gallery of Favorites

Friday, November 25, 2011

Rosemary Bread


I hope everyone had a wonderful Thanksgiving! We sure did! There was so much food that I can't even remember everything. I do remember the turkey though because we had 3 of them. Yes, 3! We're a big group. :) One was deep fried, one was baked, and the last one was smoked. How did everyone else cook their turkey this year?

My main job this year was the bread, although I did bring several other things. I ended up making dill bread, honey oat bread, and rosemary bread. I was shocked to see that I hadn't posted my rosemary bread recipe. It's a favorite and is the number one bread requested by my mom when we have a gathering.

Enjoy! And happy holidays everyone!

Several types of bread that I made, including the rosemary of course :)
Rosemary Bread
Serving Size = 1 1/2 lb loaf
  • 1 cup water
  • 3 tablespoons olive oil
  • 1 1/2 teaspoons sugar
  • 1 1/2 teaspoons salt
  • 1/4 teaspoon Italian seasoning (I just pour in some oregano, thyme and basil)
  • 1/4 teaspoon ground black pepper
  • 1/2 tablespoon dried rosemary (original calls for 1 tablespoon, but I think it's too much)
  • 2 1/2 cups bread flour
  • 1 1/2 teaspoons active dry yeast
Optional for second method
  • 1 egg white
  • 1 tablespoon water
  • Extra rosemary and sesame seeds for decoration
  1. Place everything into your bread machine in the order recommended by the manufacturer. Select white bread/basic cycle, medium crust, 1 1/2 lb loaf and press start.
  2. OR, and this is the way I did it (I've done both and they both work, but I prefer this second method) select the dough cycle on the machine and let it do the work. Then remove the loaf from the bread machine and place into a greased 8x4-inch baking pan, turning once to coat the top of the bread. Cover with a towel and leave in a warm place for 30 minutes.
  3. Mix together an egg white with 1 tablespoon of oil and brush the top of the bread. Sprinkle with sesame seeds and rosemary for decoration (optional).
  4. Preheat oven to 400F. Bake bread for 25 - 30 minutes, or until golden brown and creating a solid sound when tapped.

Monday, November 14, 2011

French Onion Soup and Croutons


If you're pantry is empty, or if you want to save money.... OR if a newborn kept you awake all night and you want a very easy to make lunch, then here's your recipe.

It's so easy a caveman could do it.
hehehe
Couldn't resist.

Anyway, I made rye bread the other day to go with our steak dinner. Of course there were leftovers, so the next day I chopped up the extra bread and made croutons. This gave me the idea to make French onion soup because I could top it with croutons and cheese. I thought this would be more interesting than a salad. And I was right, much more interesting.... and tastier too. Plus, it's cold outside so it's perfect soup weather.

Rye croutons
Croutons
Serving Size = 4 cups
Original Recipe
  • 4 cups of breads
  • 2 teaspoons garlic salt (I just use garlic and salt)
  • 1/4 cup of butter, melted or use EVOO
  1. Preheat oven to 325F.
  2. Cut bread into 1 inch cubes. Toss with EVOO or melted butter until very lightly coated. Add seasoning and toss to coat (I just used garlic powder and salt).
  3. Place on a baking sheet and bake for 20-35 minutes, or until toasted and crispy.

Start cooking the onions
After a while they should start to caramelize
Add the broth, parsley, simmer and serve
French Onion Soup
Serving Size = 2
  • 2 1/2 cups beef broth (you could also use chicken, vegetable or a combination)
  • 1/2 tablespoon of lemon juice
  • 1/2 teaspoon dried thyme
  • 1 bay leaf
  • 1 tablespoon of flour
  • 2 onions, thinly sliced
  • Salt/Pepper
  • 3 cloves of garlic, finely chopped
  • 1 tablespoon of parsley, chopped
  • Gruyere, Swiss cheese, or fontina
  • Croutons or bread (handful for each bowl or 1 slice per bowl)
  1. Place a stock pot on the stove and set the heat to medium. Add 1/4 stick of butter and let it melt.
  2. Slice the onions thinly (I slice them like thin onion rings) and add to the stock pot. Stir well and add the bay leaf, thyme, salt and pepper. Let the onions cook until they are golden brown and soft (about 25 or 30 mins). In the last few minutes, add the garlic and stir.
  3. Once the onions finish, add 1/4 cup or so of beef broth to deglaze the pan. Stir well so that the brown bits come off the bottom. Once the liquid evaporates, add the flour and stir. Turn the heat down to medium low to keep the flour from burning and cook for about 10 mins to remove the raw flour taste.
  4. Add the rest of the beef/chicken broth and the parsley. Adjust the heat to a simmer and let it cook for another 10 mins. Now it's ready to serve.
  5. Place the croutons on top of the soup, add the cheese and place under a broiler until the cheese melts and browns a bit. You could also just slice some bread, place the cheese on top, broil and then place on top of the soup. Garnish with parsley.

Dear Santa,
Did you see the stunning bowl at the top? Even though I love and adore it, I'm not sure it's made for French onion soup. Could you please deliver me a set of red Technique Flame 2 cup soup bowls that are made for onion soup? You know, the ones with the cute little handles that can also be used on the stovetop, in the oven, broiler, freezer, anywhere, any time, any place, completely amazing.... you get the point. :)
Thanks so much,
P.S. I promise to post more cookie recipes.


Linking to: Mangia Mondays, Tuesday Night Supper Club, Tuesdays at the Table, Hearth and Soul

Tuesday, November 8, 2011

Krachel Bread Pudding


We celebrated a holiday over the weekend so I decided to make some krachel. I ended up with leftovers because my appetite isn't as big as it was when I was pregnant. So with 4 krachel remaining I decided that bread pudding was a brilliant idea. Unfortunately, I know very little about bread pudding so this was all new to me. Even though I'm a bread pudding newbie, I have to say this was delicious. The anise seeds really added something special in the background without over powering the dessert. I also like the amount of custard. Some people prefer very dry bread pudding but I prefer more custard. If you want yours to lean to the dry side then go ahead and add another krachel.

Cube the bread 
Cube the apples 
Pour the egg/milk mixture over the top and push down with a fork or spoon 
Remove from oven and let cool
Close up

Click here for the Krachel Recipe
(Note: When I made my krachel, I used 2 teaspoons of anise seeds)

Krachel Bread Pudding
Serving Size = 1 8-inch square pan (I cut it into 9 small pieces)
Original Recipe
  • 4 krachel, cubed, bite size
  • 1 apple, peeled and cubed, bite size (optional)
  • 2 tablespoons unsalted butter, melted
  • 4 eggs, beaten
  • 2 cups of milk
  • 3/4 cup white sugar
  • 1 teaspoon ground cinnamon
  • 1 teaspoon vanilla extract
  1. Preheat oven to 350F.
  2. Place the cubed krachel into an 8-inch square baking dish and top with the apple. Pour the melted butter evenly over the top.
  3. In a mixer, mix the eggs and then add the sugar. Mix in the cinnamon, vanilla and milk until combined.
  4. Pour the milk mixture over the bread mixture and then push down gently with a fork to make sure the bread is covered and soaking up the milk.
  5. Bake in the oven for 45 minutes or until a knife inserted comes out fairly clean (I added about 15 extra minutes, but watch yours closely). Place on a wire rack and let cool at least 30 minutes and serve.
Note: You can replace the krachel with a different bread. Just fill the 8-inch pan roughly 3/4 of the way full.

    Saturday, November 5, 2011

    Banana Crumb Muffins


    Banana Muffins. The perfect breakfast and snack throughout the day when you are dead tired. And I am. So very tired. Surprisingly, not from a lack of sleep due to a tiny newborn entering our lives. I'm just worn out today. Maybe the excitement from the last 2 weeks is catching up with me. Who knows! My Mimi loves these muffins though and calls them "cake." She tries to get into them when I'm not looking. She actually gave me a heart attack because while they were cooling on a wire rack, she picked up the entire rack and carried it into the living room. I have no idea how she kept from dumping them on the floor, but she didn't.

    By the way, newborns are not challenging at all. They can't move. They eat, sleep, and you can set them anywhere. 2-year-olds though, that's another story. They climb on everything, move everything, run everywhere, leap off of couches, write on walls, and never sit still. Maybe this is why I'm tired. Chasing a 2-year-old is exhausting folks, exhausting. But I love it, really. I love being a mom.


    Banana Crumb Muffins
    Serving Size = 10 muffins
    Original Recipe
    Batter
    • 1 1/2 cups all-purpose flour
    • 1 teaspoon baking soda
    • 1 teaspoon baking powder
    • 1/2 teaspoon salt
    • 3 bananas, mashed
    • 3/4 cup white sugar (I reduced to 1/2 cup)
    • 1 egg, lightly beaten
    • 1/3 cup butter, melted (unsalted)
    • 1 teaspoon vanilla (my addition)
    • 1/2 teaspoon cinnamon (my addition)
    Topping
    • 1/3 cup brown sugar, packed
    • 2 tablespoons all-purpose flour
    • 1/8 teaspoon cinnamon
    • 1 tablespoon butter, unsalted
    1. Preheat oven to 375F. With a mixer, cream together the sugar and butter. Add the vanilla and egg, mix. Add the bananas. 
    2. Combine the dry ingredients for the batter and then add to the banana mixture until just moistened, do not over mix.
    3. Grease a muffin tin (I didn't use paper liners) and fill 3/4 of the way.
    4. For the topping, mix together the brown sugar, flour, and cinnamon. Cut in the butter until it resembles coarse cornmeal.
    5. Sprinkle the mixture evenly over the top of each muffin.
    6. Bake for 18-20 minutes, or until an inserted toothpick comes out clean. Remove from tin and place of wire rack to cool.

    Saturday, October 22, 2011

    Honey Oatmeal Bread


    I think this might be my favorite bread recipe. It's a close one though. I adore French bread as well. This bread has a slight sweetness to it from the honey and stays soft even after 1 day. Normally bread starts to get tough the next day but this one stays fresh. This is great served with dinner, as a snack, or even as a sandwich. The original recipe uses a bread machine and cooks it in the machine as well. I skipped this because even though I love my bread machine, I tend to have better bread when it's baked in the oven. So I used my bread machine to mix it and then moved it to the oven. Worked beautifully!

    And today is October 22nd!! My due date is only a few days away! I'm getting excited to meet baby Emmett and introduce him to his sister. I've been going over all of the pregnancy memories. I was thinking about when my husband and I found out the sex of the baby. I was getting the ultrasound and within seconds I looked over and saw my husband smiling. I assumed he was excited to find out the results but he had actually gotten a glimpse of the gender and knew we were having a boy. He would have been happy with a boy or girl, but deep down he was hoping for a boy so we would have one of each. Of course, I can't read ultrasounds at all and most of the time I have no clue what I'm looking at so the technician had to announce it to me. It was a fun and exciting day. :)

    I am going to miss being pregnant though. Everything has been pretty simple from day one so I have few complaints. I will definitely miss the following:
    1. Feeling the baby kick
    2. Baby hiccups!
    3. The long, difficult and even irritating name search but the relief when I finally found one
    4. The growing belly
    5. The overall excitement
    I'll keep everyone posted. Hopefully he'll make his appearance soon!

    Place into a pan
    Brush with egg white and sprinkle on oats
    Remove from oven
    Remove from pan immediately and cool on wire rack
    Honey Oatmeal Bread
    Serving Size = 1 lb loaf
    Original Recipe
    • 1 cup of water
    • 1 tablespoon of vegetable oil (I used EVOO)
    • 1/4 cup of honey
    • 1 teaspoon of salt
    • 1/2 cup rolled oats + extra for sprinkling
    • 2 1/3 cups bread flour (plus more if needed)
    • 2 teaspoons active dry yeast (original recipe added 1 but based on the reviews I bumped it to 2)
    1. Place in bread machine on dough cycle. Once the dough starts mixing, check it to see if you need to add more flour. The dough should be a bit sticky.
    2. Once done, place into an 8x4-inch baking dish sprayed with oil. Cover with a towel and let raise for 30 minutes in a warm place (I usually preheat the oven for a minute, shut it off, and then add the bread). Brush with 1 egg white plus 1 tablespoon of water. Sprinkle on some oats. Bake in oven at 350F for 25 - 30 minutes. Remove from pan immediately and let cool on wire rack.
    3. Note: If you want, you can cook it in the bread machine (I haven't tried). The original recipe recommends cooking it on the light setting.