Showing posts with label Party Food. Show all posts

Wednesday, June 6, 2012

Jalapeno Popper Stuffed Mushrooms


While walking through the store the other day, I happened to see a sale on large stuffing mushrooms. Of course, I couldn't pass up this deal, so I grabbed a few. I love finding manager markdowns in the store. Sure, I only save a dollar or two, but over time it really does add up. If you keep your eyes open for deals, and stay flexible with your meal planning, you can really save on your grocery bill over time.

Anyway, back to the mushrooms. Since I had some jalapenos and lots of cream cheese, I thought I would stuff it all into mushrooms and see how it turned out. My idea was to make them similar to cream cheese jalapeno poppers. It worked out beautifully! To give it more texture, so it wouldn't turn into cream cheese soup, I took the leftover mushroom stems, chopped them up, and added them to the filling. I also added several of the seeds from the jalapenos to spice it up. Finally, I topped them with bread crumbs and Parmesan to give them a nice crunch.

Jalapenos and garlic
Mushroom stems
Fresh Parmesan
Everything mixed together
Stuff the mushrooms and top with Parmesan and breadcrumbs

Jalapeno Popper Stuffed Mushrooms
Serving Size = 2
  • 2 jalapenos
  • 1/4 - 1/2 cup Parmesan (fresh)
  • 3 cloves garlic, finely chopped
  • 1 - 2 tablespoons bread crumbs
  • 1 - 2 tablespoons Parmesan
  • Stuffing Mushroom (about 6, or a 14-oz package)
  • Leftover Mushroom Stems
  • 1 tablespoon oil (I used EVOO)
  • 4 oz cream cheese
  • Salt/Pepper
  1. Preheat oven to 350F.
  2. Remove the stems from the mushrooms. Set the mushrooms aside (in a baking dish) and finely chop the stems. Add the oil to a small saute pan over medium heat, and add the stems. Add the garlic, jalapenos (add the seeds if you want it spicy), salt, and pepper. Saute until everything is softened.
  3. Remove from heat and pour into a bowl. Add the cream cheese and mix (my cream cheese was cold, but when I added the hot ingredients and mixed it, the cream cheese came to room temperature).
  4. Stuff the mixture into each mushroom. Top the mushrooms with Parmesan and sprinkle on the breadcrumbs.
  5. Bake for about 30 minutes, or until the mushrooms are softened. To get the brown crust on top, I put the mushrooms under the broiler for 1 - 2 minutes.

Thursday, April 12, 2012

Fried Baby Artichokes


Confession. I am horrible at preparing fresh artichokes. Just horrible. I rarely make them correctly, and after I make them I usually swear I'll never mess with them again (while using swear words, actually.... haha). Luckily, this time around went better than expected. The drool-worthy appetizer you see above only had one tiny problem. Either I needed to peel them more, or I over-cooked them a bit because the outer leaves were a little chewy. It wasn't a problem though because I just peeled off a few leaves and they were good to go.

After watching David Ziff make these on Barefoot Contessa, my first thought was that is might be oily. The recipe calls for starting the artichokes in cold olive oil and then increasing the temperature to fry them. Yes, they had oil on them but no, they weren't oily. Just a normal amount of oil that you would expect from fried food. Although, since a bit of oil does remain on them, you definitely want to use some good quality olive oil, which brings me to my second concern. I didn't want to waste an entire bottle of olive oil. But this isn't really a problem. Once you finish cooking the artichokes, let the oil cool, strain it with cheesecloth (to remove the thyme, garlic, and any pieces of artichoke), and then pour it back into the bottle to re-use. The oil takes on a little bit of the garlic and thyme flavors, so it's perfect for most recipes. And don't waste the garlic either, smear it on some bread and serve it with dinner. It's heavenly.

Peel and slice the artichokes
Place into cold oil and turn on the heat
Bring the temperature up to cook
Bring the temperature up again to fry until brown
Serve as an appetizer
Fried Baby Artichokes
Serving Size = 4
Original Recipe: David Ziff, Barefoot Contessa
  • 10 baby artichokes
  • Olive oil
  • 6 garlic cloves, peeled
  • 1 bunch fresh thyme (I had to use dried, about 1 1/2 teaspoons or so)
  • 1 teaspoon salt
  • 1/2 teaspoon black pepper
  1. Remove the artichoke stems and discard. Remove approximately 18 leaves from each artichoke, dispose of the leaves. Slice the top half of the artichoke off, so that only the light green part remains (they will be about 1 1/4 inches after being trimmed). Cut the artichoke in half, lengthwise.
  2. Place the artichokes in a medium pot, cut side down, and pour on olive oil until just covered (a little over 17 oz, roughly). Add the garlic, salt, pepper, and thyme. 
  3. Bring the olive oil to a boil, cover, reduce heat to low and simmer for 15 minutes. It's done when a knife can be easily inserted.
  4. Remove the thyme and garlic (I used dried thyme, so it stayed in the pot), raise the heat and fry uncovered for 2 - 3 minutes, turning artichokes halfway (I cooked them longer though, which might have been a mistake). They are done when they are golden brown and crispy.
  5. Remove to a paper towel to drain, sprinkle with salt and serve.
Linking to: Gallery of Favorites, Foodie Friday

Friday, December 23, 2011

Spritz Cookies


Several weeks ago I was shopping on Amazon for Christmas gifts when I saw a cookie press (Kuhn Rikon Clear Press) and thought it would be something that Mimi would enjoy working with. We made some cookies today and she loved it. She really couldn't press the cookies out of the press because it requires some strength, but she liked watching me. Her favorite part was decorating them though. I gave her red and green sprinkles and she decorated each cookie. I love that she's old enough to cook with me in the kitchen. Today, we made spaghetti and meatballs for dinner. She wanted to stir the sauce, so I let her and then I tasted the sauce. Well, even though she never wants dinner, she saw me taste the sauce and so she had to taste it too. The same thing happened with broccoli not too long ago. 
I know!
A kid that eats broccoli! I was amazed too! I even called my husband in so he could see what was happening. haha!

Anyway, back to the cookies! :) They were delicious and lots of fun for the family. I'm sure Emmett will love decorating them someday as well. The press was worth the investment, although it can get a bit irritating when the cookies do not come out correctly. But since I only plan to make them on special occasions, it wasn't that bad.

Merry Christmas everyone!

Dough
Make cookies and give to toddler to decorate
Tree
Star
Spritz Cookies
Serving Size = About 3 dozen cookies
Original Recipe
  • 1 cup of unsalted butter, room temperature
  • 1 cup sugar
  • 1 egg, large (needs to be large)
  • 2 1/2 teaspoons vanilla extract
  • 1/2 teaspoon salt
  • 2 1/2 cups flour (all-purpose)
  1. Preheat oven to 375F.
  2. Cream together the butter and sugar. Add the egg, vanilla, and salt. Mix until combined
  3. Slowly add the all-purpose flour, stirring slowly until just combined.
  4. Load the cookies into the press and choose which shape you want. Press onto an ungreased cookie sheet (we added colored sugar). Bake for 10 - 12 minutes. Remove to a wire rack to cool.
  5. Tip: I had an easier time making the cookies when the cookie sheet was a tiny bit warm.

Thursday, November 17, 2011

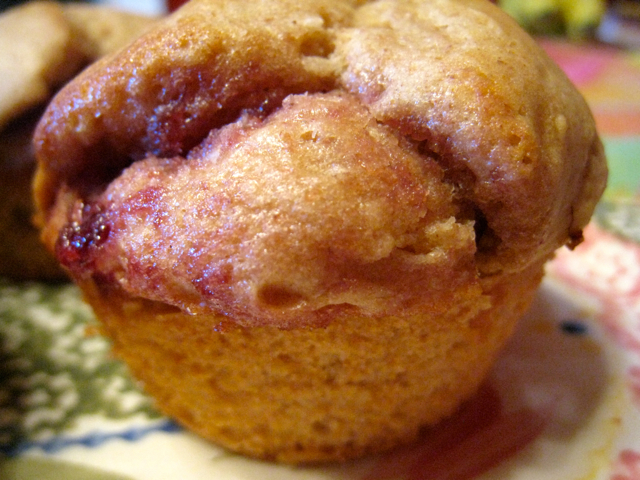
Peanut Butter and Jelly Muffins


First off, let's discuss the muffins. They are yummy and we need to address them immediately. :) My friend Casondra at Pieces of my Heaven on Earth sent this recipe to me. She said her kids love it and I knew my 2-year-old would too. She loves peanut butter and eats it straight from the jar every day. I'm not a huge PB&J fan but even I think these are good. The PB flavor is mild and the muffin is not too sweet overall. Also, they're not dense, which was surprising. Another plus though!

Ok, the next item to address.... EXHAUSTION! Woowwwww I'm tired. I only have 2 kids so I feel like I don't have the right to complain, but wow.... sleepy. My mother-in-law has 10 children. How did she do it? Really, how??

Anyway, it could definitely be worse so I'm not going to complain too much. My little man Emmett has had stomach pains throughout the day so it has been a bit exhausting, but he actually does pretty well sleeping at night. He tends to wake up at 5:30am every so often though but that doesn't bother me too much. Mostly it's just during the day that wears me out. Any suggestions on how to ease tummy pain in infants??


PB&J Muffins
Serving Size = 12 regular size muffins
Original Recipe: Pieces of my Heaven on Earth
  • 1 cup all purpose flour
  • 3/4 cup whole wheat flour
  • 1/4 cup sugar
  • 1/4 cup dark brown sugar
  • 1 tablespoon baking powder
  • 1/2 teaspoon salt
  • 1 1/4 cups low fat milk
  • 2 tablespoons melted butter (unsalted)
  • 1/3 cup creamy peanut butter
  • 1 egg
  • 1 teaspoon vanilla extract
  • 12 teaspoons jam (I used raspberry)
  1. Preheat oven to 400F.
  2. Combine both flours, sugars, baking powder and salt in a bowl and set aside.
  3. Using a mixer, mix together the milk, butter, peanut butter, egg and vanilla. Mix until combined. Pour in the flour mixture and mix until just combined.
  4. Grease a muffin tin and fill halfway (or less, but not more or you will run out of batter) with batter. Add 1 teaspoon of jam to each muffin and then cover with the rest of the batter. 
  5. Bake for 20 minutes. Remove from oven and let cool in muffin tin for about 5 minutes then remove to cool on a wire rack.

Friday, November 11, 2011

Two Jalapeno Popper Dips - Regular and Low Calorie

This is the original version, it makes a smooth cheese topping

I found this recipe over at Mrs Happy Homemaker. You can also find her link under my "Blogs I Adore" page at the top. Yes, I adore her blog, so check it out. :) Anyway, as soon as I saw the title of this dip I knew I would have to try it. We're big jalapeno popper fans in this house. I actually made this dip two different ways. One was a low calorie way (my additions) and the other one was the original full fat version (Mrs Happy Homemaker recipe). So you can choose either one. Both were delicious. The full fat version was richer and had more oil, the low fat version had a tangy flavor and less oil. The low calorie one has a crisp crust and the original has a smooth, cheesy crust. Again, both were yummy.

I actually came up with the low calorie one because, as you can guess, I need to lose some of my pregnancy weight. Yikes. And yikes again.


Jalapeno Popper Dip - Original Version
Serving Size = Almost 2-quarts (About 8 - 12 people)
Original Recipe - Mrs Happy Homemaker
  • 2 8-oz packages of cream cheese, softened
  • 1 cup of mayonnaise
  • 8-oz diced green chiles
  • 2-oz canned jalapenos, chopped (I doubled this for medium-hot --- see note below)
  • Parmesan cheese, shredded/grated, roughly 1/4 cup (I used my micrograter)
Note: I've used pickled jalapenos and fresh jalapenos. Both were great, just remember to cut the fresh jalapeno into very small pieces.
  1. Preheat oven to 400F. 
  2. Combined everything but the Parmesan cheese and place into a 2 quart casserole dish. Sprinkle the Parmesan cheese on top.
  3. Bake for 25 minutes or until the cheese is melted and browned a bit.
Low calorie version uses sour cream and panko bread crumbs

This is cooked. The lower fat version makes a crispier crust with the cheese


Jalapeno Popper Dip - Lower Calorie Version
Serving Size = Almost 2-quarts (About 8 - 12 people)
  • 2 8-oz packages of cream cheese, softened
  • 1/2 cup of mayonnaise
  • 1/2 cup sour cream
  • 8-oz diced green chiles
  • 2-oz canned jalapenos, chopped (I doubled this for medium-hot --- see note below)
  • Parmesan cheese, shredded/grated, roughly 1/4 cup (I used my micrograter)
  • Roughly 1/4 cup of panko bread crumbs (just eye it)
Note: I've used pickled jalapenos and fresh jalapenos. Both were great, just remember to cut the fresh jalapeno into very small pieces.
  1. Preheat oven to 400F. 
  2. Combined everything but the Parmesan cheese and place into a 2 quart casserole dish.
  3. Mix together the Parmesan and the breadcrumbs and sprinkle over the top.
  4. Bake for 25 minutes or until the cheese is melted and browned a bit.

Tuesday, October 18, 2011

Cheesecake Dip (Very Easy!)


If you're looking for a dip that's quick, easy, and loved by all then here it is folks. It's creamy and not too rich or too sweet. Even though it's a dessert dip it doesn't feel heavy, especially since you can serve it with fruit. I think people that are not fans of baking will especially love this recipe. You can mix it up in minutes and then serve it with several varieties of fruit or graham crackers. Super simple but still attractive when you bring it to the table.

This recipe came about because we spent the entire day working on the house. I wanted my evening sweets but I didn't want to make something complicated or that would dirty 50 thousand dishes. So far we've managed to put up more trim, fix the countertops, did a massive amount of cleaning, and completely re-organized my entire dish collection. I can walk into the kitchen and find the bowl I want instead of pulling everything out of the cabinets, getting frustrated, and then calling my husband in to finish the search. I'm kind of a baby some times. :) I'm 39 weeks pregnant so time is running out. I really want this house in order before Emmett arrives. Fingers crossed!


Cheesecake Dip
Serving Size = About 1 cup
Original Recipe
  • 1/3 cup sour cream
  • 4 oz cream cheese softened
  • 1/4 teaspoon vanilla extract (could also use almond extract, but I went with vanilla)
  • 1 tablespoon of milk
  • 2 - 3 tablespoons powdered sugar (I went with 3)
  1. Mix everything together with a hand mixer until smooth and serve. It's best to refrigerate for an hour or so until it firms up more.
  2. I served mine with grapes, apples and graham crackers.

Wednesday, October 5, 2011

Roasted Pumpkin Seeds


Severe back pain has now kicked in. The joys of pregnancy. I actually didn't have this problem with my first pregnancy, thank goodness. I'm pretty much stuck on the couch. If I try to do dishes, laundry, or move around too much then I get shooting pain in my back. On the bright side, I am very thankful that this occurred in the last 3 weeks of pregnancy and not sooner.

Actually, it's closer to 2 weeks now. Ahhh!! I'm so excited!! :)

Before back pain entered my life I did do a few fall activities --- one very popular one --- Pumpkin carving!!!! Yes, I am a mature adult. I sat on my porch drinking tea, eating caramel corn, and carving pumpkins. hehe

So here is the result but cut me some slack, I am not very good at this......

He's a happy pumpkin. I'm more into cute decorations
and not the scary kind.

What I am good at is dealing with the pumpkin guts. :) I cleaned them, picked out the seeds, and roasted them. YUM! Even my toddler was munching on them and she's very picky. Now, there are a lot of ways to roast pumpkin seeds. Some people boil them, dry them, then roast them and all kinds of other techniques. I probably only eat pumpkin seeds once a year during Halloween, when I'm carving the pumpkins, so I haven't tried very many different versions. But I love this recipe and it's super easy.

Spread them out on the pan and roast

Roasted Pumpkin Seeds
  • About 2 teaspoons of melted butter per 1 cup of seeds
  • Salt to taste
  1. Preheat oven to 300F.
  2. Clean the pumpkin seeds off. I usually put them into a strainer and fill it with water. The seeds float to the top a bit and I scoop them out. Rinse once more to make sure everything is clean, but it doesn't have to be perfect. Dry them off with a towel and place them into a bowl. Toss with the butter and salt to taste. Lay on a baking sheet in one even layer. Roast for about 45 minutes, stirring from time to time.

Sunday, October 2, 2011

Cilantro French Bread


It's time for me to welcome a new member to our family. Baby Emmett? Nope, not yet!

A beautiful, made in America, hand thrown chip and dip set. We all know I love pottery. I REALLY love American pottery though and I've been trying to beef up my collection a bit. The reason I love it isn't just because I'm supporting small businesses in the US but because they match everything I own. Really. Most US pottery that I find only uses about 3 or 4 colors, which means it's super easy to match it up with my hand painted, extremely bright, very busy, international pottery. My collection is made up mostly of American pottery and accented with pottery from different countries (Morocco and Mexico mostly).

Ta da!
I love that the bowl can be removed, leaving a big platter
I'm trying to be artistic :)

Anyway, I LOVE it so expect to see it often. :) I want to make some type of fruit dip next.

As for the bread, that turned out pretty well too. I've seen a recipe similar to this on Bon Appetit, but instead of following their bread recipe I just made French bread and rolled the herbs up inside of it. I definitely prefer it dipped in hummus than as a stand alone bread. For the hummus, I left out the paprika and cilantro. I also used tahini since I recently found a brand that doesn't cost a fortune or expire in 2 minutes.

Mix the herbs and oil 
Spread onto the bread and sprinkle on the sesame seeds
Roll up the bread
Cilantro French Bread
  • 1 cup of cilantro and parsley (mostly cilantro, a bit of parsley - or skip the parsley all together)
  • 3 tablespoons of oil (EVOO)
  • Sesame seeds to taste
  • French Bread Recipe (I used bread flour and halved the recipe. By the way, I need to write a new review for this bread because the more I make it the more I love it.)
  1. Chop up the cilantro and optional parsley. Add the oil and mix. After you roll out the French bread, spread the herbs across the bread evenly. Sprinkle on the sesame seeds (as much as you like) and roll the bread up. 
  2. Continue with the rest of the French bread recipe.
Hummus
  1. I left out the paprika and herbs. I also used tahini instead of a nut butter substitute.

Wednesday, August 31, 2011

Pita/Flatbread/Pizza with Za'atar


I wanted to share this quick and easy recipe with you. I still haven't posted a recipe for za'atar, but I plan to once I use up my store bought version. This is a great snack or just something to serve with dinner to replace rolls. My favorite thing to eat this with is a salad though.

Click here for the recipe for homemade pita bread.

Pita /Flatbread/Pizza with Za'atar
  • Extra Virgin Olive Oil
  • Za'atar Seasoning Blend
  • Pita Bread (what I used) or flatbread or even a small thin cooked pizza crust
  1. Preheat oven to 400F.
  2. Brush the bread with a little bit of EVOO and sprinkle on a teaspoon or so of the za'atar seasoning. Bake in the oven for a few minutes, until warm and as brown as you want.
  3. Cut into wedges and serve. 
In other news, I am working on a second blog. I've decided that the Baby Talk page is so much fun that I want to expand it. I also thought that cloth diapers and recipes were not a good combination! :) This blog will focus on family/children, no recipes though. Even the kid-friendly recipes will still remain on this blog.

I've also been stressing about the following:
  • Baby Names
  • Baby Diapers
  • Cleaning the house for.... the baby
  • Baby Clothes
  • Baby Supplies
  • How will Mimi like the baby?
  • Where will the baby sleep?
Are we seeing a pattern here?
My mind has went into full-blown baby mode to the point where I've gone a little loony. I can barely think about anything else (good time to start a baby blog) and as soon as I make a decision, I change my mind. I've had to tell myself to calm down because I would burst into tears. I'll try a few diaper brands, I have two names picked and I'll make one permanent when I see the baby, the house will get clean, and how many outfits and supplies does a newborn really need? C'mon. I can see that nesting is right around the corner. I'm kind of looking forward to it. Clearly I have some energy that needs to be put to good use. Don't worry though, I went loony towards the end of my pregnancy with Mimi as well. Apparently this is normal for me.

Anyway, there ya have it! I'll keep you posted on my second blog. :)